I am beyond excited to type these words - we have, after almost six months of living in Cora the Caravan, finally moved into our house! We are no longer living in a space that was about the size of our bathroom in Japan. Hubby and I can now move without bumping into/stepping on each other and it feels wonderful :o).
Apologies for the poor quality photo but I've not had chance to take any recently
Whilst the sense of space feels wonderful, the reality is still some way away. The house is very much a building site. We have no internal doors, no finished rooms, nothing to sit on bar the bed but we are inside, and that is the most important thing. It has very much been the weather that has accelerated our move to the inside. The torrential rain was one thing, but coupled with the gale force winds, it was becoming increasingly difficult to sleep in Cora. Especially when we could hear the trees creaking as they swayed crazily above us. Oh the nights when we've laid awake debating the possibility of a tree coming down on us! The wind has been so severe on some days that Cora has actually rocked and swayed herself, and I've wondered if we'd wake up finding ourselves drifting in the sea in our metal home... dramatic I know, but very real in my dream let me tell you!
In an ideal world, we would have liked the renovations to be a bit further along before moving in but the temperature has dropped significantly this week, and with there being no end in sight on the rain/wind front we decided to take the plunge. Luckily the basic necessities are in place. We have heating, hot water, a working toilet, sink and bath (no shower yet), and we have a kitchen sink and hob (but no refrigerator so we continue to use the one in Cora), oh, and a bed of course.
Now that we feel a bit more sheltered from the elements, we can hopefully start to sleep a little better - once we become accustomed to all the strange noises the house itself makes ;o). It also means that we (when I say 'we' I mean hubby, for the most part) can carry on working later into the night and make some good headway in the coming weeks.
If you're facing weather conditions anything like what we have here in the UK, then I hope you manage to stay safe and dry :o).
I finally have another update on the From Stables To House renovation. If you missed the previous update then you can catch up here. I haven't done an update for a few weeks and there are a number of reasons for that. Firstly, a lot of the work has been a bit more behind the scenes (like sorting out the wiring, plumbing and reconnecting our mains water supply). Secondly, hubby and I have been finding living in a caravan a bit tough lately. We have been living in our metal tin for five months now! Five very long months! The weather has turned colder and we've had a lot more rain recently, which means we barely get any sleep on rainy nights because the raindrops make so much noise when they hit the caravan roof. Even if the rain stops, we then get water dripping from the trees above falling onto the caravan. We are also experiencing some very severe winds at the moment, and being by the coast means we are getting the worst of the crazy weather. I've spent nights wondering if the trees at the back of the house are going to come down on top of the caravan!
Aside from that, we miss being able to take baths and having a nice bathroom... actually forget bathroom, we just missing having a nice home. A home where we have a fully functioning kitchen with a decent sized refrigerator, and our personal belongings around us. Another thing that's been making me a bit unhappy is that our diet isn't as clean and healthy as it usually is. We find ourselves snacking a lot more (on the not so healthy stuff), and opting for the convenience and ease of cooking pasta or eating bread/wraps, given the kitchen limitations in the caravan. I am so carb-ed out right now that I cannot wait until we can start using our new kitchen - I'll be gorging on oven roasted vegetables, smoothies and salads :o).
We now have painted window frames
Finally, we've just had a bit of a challenging time with some of the tradesmen. We've had people accept jobs and then not turn up or turn up a week later than agreed... a whole week late! This obviously has a knock on effect on the works schedule. We've also been a bit frustrated with some workmen just being very careless when onsite. We've had several packs of tiles broken, wires have been drilled through, walls have been damage... all accidentally of course, but nonetheless it still costs us money to then put right other people's mistakes. I guess people aren't that diligent when it's not their money or home that's at stake.We are currently a month behind where we should be and that delay is
purely down to people not turning up for work on time and rectifying mistakes made by others.
On a more positive note, we've had our boiler installed and being able to run the underfloor
heating is a real joy as a lot of the work we are doing now is inside
the house. Things are progressing as you'll see in the video above, and this is keeping hubby and I motivated to push on.
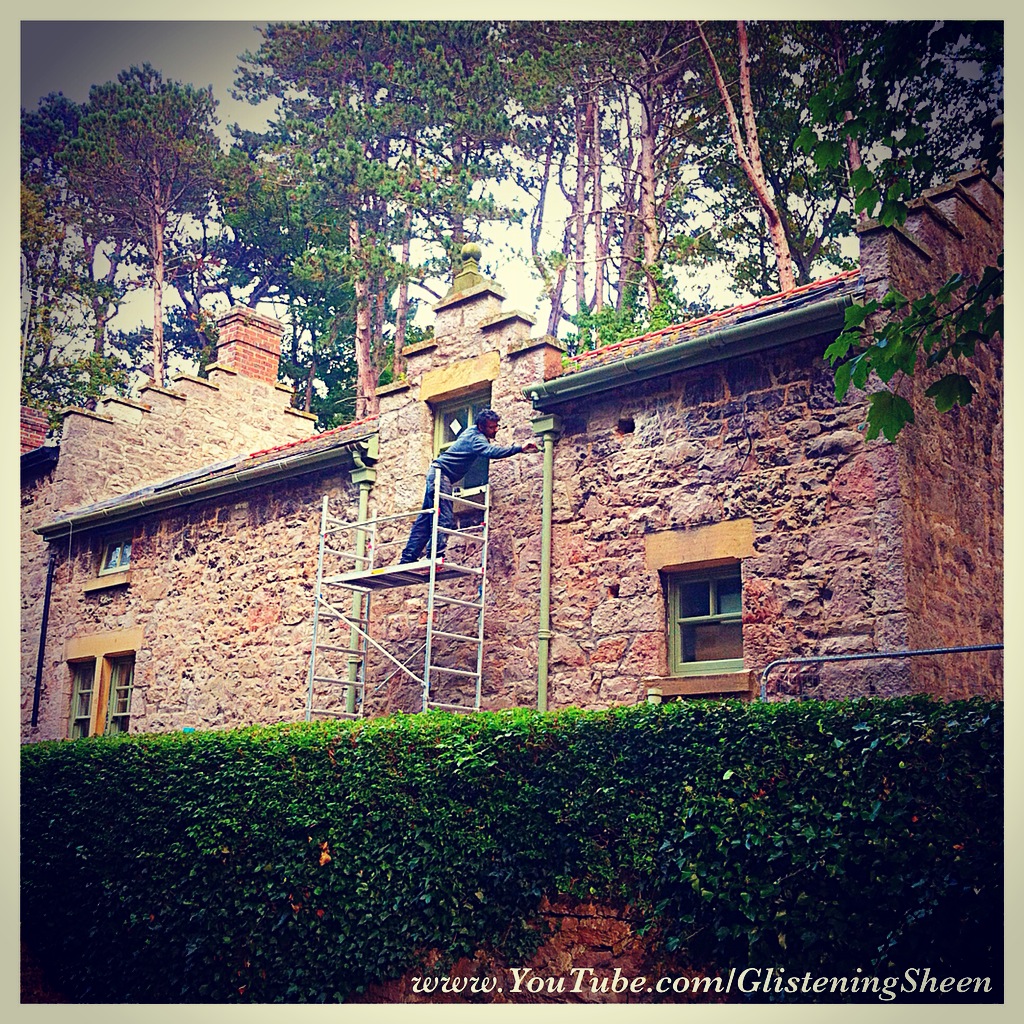
Due to the wet weather, we have been prioritising getting the gutters and drainpipes up. Restrictions from the conservation officer mean that we have had to replace all of the plastic gutters and drainpipes with cast iron ones. As these are quite expensive new, hubby has been collecting second hand ones for over a year now from ebay and various online sites. We've had to buy some new pieces, but overall, hubby's initiative of searching for these months before we actually needed them has helped to keep the cost down significantly :o). In the photo above you can see hubby cleaning up a second hand drainpipe that was painted bright green. Once the paint was removed, we painted it in a rust coloured primer for additional protection from the sea air, before painting it in our chosen colour which is lichen by Farrow and Ball. Lichen is a beautiful sage green that we've used not only
on the gutters and
drainpipes, but also on the window frames and external door frames. The
colour
looks slightly washed out on the gutters and drainpipes due to the
rusty coloured primer underneath, but on the window and door frames it
is a little bit darker and a bit more green. Hubby and I both love the
colour and feel that it compliments the natural stone of the building
really well with it being quite an earthy and muted green.
More recently hubby and I have been busy painting the upstairs. The transformational effect of painting the walls and ceilings is quite amazing. All of a sudden we feel that the upstairs isn't too far of from being finished. Hubby has also been working on getting the family bathroom fitted and tiled. As soon as a bedroom and bathroom are ready, we can move out of the caravan and into the house, whilst we complete the rest of the work, and that will be a momentous occasion indeed :o).
We have stairs!!! I recently came back onsite after over a week at my parents to find that our staircase had been installed. This is very exciting indeed! I have not been upstairs for such a long time that I'd actually forgotten what it looked like. As well as stairs, we also had a very exciting delivery. Our cast iron radiators arrived. We took a bit of a gamble on these as we ordered them online without seeing them in person first, but the gamble paid off. These are absolutely stunning - I love them:o). The intention had always been to go for matte black cast iron radiators... until we saw these. We loved how these had a modern twist and we also like the different colours and how they change depending upon the lighting.
Cast Iron Radiator
A closer look (please excuse the dust)
In the above vlog, I take you upstairs and show you how we have split the upper floor. Historically, the upstairs was split into two rooms - one very large open room with a dividing wall and door that led to the smaller room with cupboards and a kitchenette. Each room had it's own staircase.
The old larger room with it's own staircase
Door way from large room into smaller room
Old small room had cupboards & a kitchenette
Old small room had it's own staircase too
The upstairs space is very rectangular and when it came to rejigging the layout we had to work around the existing windows. We were not allowed to change the position of the existing windows nor could we install any new window openings. So we decided that the best way to maximise the space would be to remove both staircases at either end of the rectangular space, and install one that was slightly more to the centre. This way when you go upstairs you could have rooms coming off to either side of the landing as well as in front - it makes sense when you look at the photos below of the new layout :o).
Reworking the space allowed us to create a master bedroom with an ensuite wet room, a family bathroom and two further bedrooms. We were allowed to install skylights into some of the rooms with no/very small windows as they do not change the overall silhouette of the building, thus adhering to the conservation restrictions. The whole of the upper floor is built into the roof space. This means
that every room has sloping ceilings, making the rooms feel quite
cottage like.
The new layout
The new layout
Originally, we intended to have painted floorboards in the bedrooms and landing, however, most of the floorboards turned out to be very rotten. Not surprising given that the building is over 130 years old. In the end, we managed to salvage about 25% of the floorboards. As our floorboards are so old, they're a different size and thickness to what's currently available on the market. After ringing around a few reclamation yards we got lucky and found some that matched our existing ones. The reclaimed floorboards are from an old hospital, and aside from being dirty, they are in immaculate condition. There are no holes or nails in them whatsoever. In fact, hubby cleaned and sanded a small part of one and the wood looked so good that we have decided to sand and oil them, instead of painting them. Don't you just love it when things work out differently but better?!
I hope you enjoyed this little update on our renovation project.
I never thought that something as nondescript as underfloor heating would ever get me excited - but boy was I wrong! To say that I was very excited would be an understatement. Perhaps it's because summers in the UK never actually get that warm... you can forget about hot! Also, having spent the last four+ years living in temperatures of 30+ degrees C, the thought of actually getting some warmth into my bones was just too much for me to remain calm about ;o).
Hubby and I are always cold. You'd think that having been born and raised in the UK, we'd be accustomed to the climate, but no. You will always find us in front of the fire or sat with our backs to the radiator whenever we are in the UK. Growing up, my bedroom was the only bedroom in the house that, as well as a central heating radiator, also had a gas fire. As a child I was always cold, even in summer. In fact, me feeling cold all of the time was seen as being completely at odds with the rest of my family (who feel warm very easily), so much so that my mum actually took me to see the doctor about it when I was a teenager. She felt it just wasn't normal to feel this cold, all of the time - but it was. This is just the way my body is. My mum has always said that having a hubby who feels the cold as much as I do, was a real blessing for me because now there are no arguments in our house about the heating, unlike when I was a child ;o).
When I used to work (pre severe arthritis) there was a joke in the office that I had the world's most traveled hot water bottle because I used to take her (yes, my hot water bottle is a pink and fluffy 'her') on every overnight trip, and I traveled quite a lot with work. Not only that, but I also used to and still do, take her on every holiday even if it's to a hot climate like Australia or Dubai because often I find that I can never get the air conditioning in hotel rooms warm enough. The thought of feeling cold is just too much for me.
Needless to say that it came as no surprise that hubby and I opted for underfloor heating in this renovation. The idea of walking on warmth
pleases me more than I can explain! Not only that, but it also meant
that we would not have to have radiators on the ground floor which gives
us so much more freedom on where to place furniture, and what we can do
with that unoccupied wall space.
Underfloor heating pipes
Now, there is no way that I can write this blog post without giving a massive shout out to my amazing hubby because he laid all of the underfloor heating himself, having never done it before (with a little help from Andy, our carpenter). Hubby spent many nights researching, reading and watching YouTube videos all about underfloor heating.
Insulation being laid
The ground in our house was prepared with a concrete base that incorporated a damp proof membrane. Hubby then started by laying 100mm thick foil faced rigid insulation board all over the ground floor which buildings control came out to check, as this is a requirement in the UK, in order to meet energy saving regulations.
Ground floor insulated
Over the insulation board, visqueen sheeting (the black sheet you can see in the photo below) was laid to create a waterproof membrane. Hubby then spent days on his hands and knees laying the
water pipes in accordance with the design provided by the underfloor heating supplier. Basically, he was creating continuous loops of pipe with no joints, that started and finished at the underfloor heating manifold. Hubby laid over half a kilometer of pipe which was pinned down
into the insulation by white barbed pegs.
No underfloor heating pipes under the kitchen island
Hubby created different zones with the underfloor heating pipes so that we could pick and choose which areas of the house had the heating on at any given time. There were specific areas such as the kitchen cupboards, kitchen island and the corner where the wood burning stove would be going in the living room where he didn't lay any pipes as those spaces don't need to be heated. The pipes were then pressure tested with water to ensure there were no leaks.
Screed being poured with laser leveled tripods
The day before the screeding mix was poured over the pipes, workmen came to place metal tripods all over the ground floor. These tripods were set up to a pre-specified level that the screed would be poured to, and they had been laser leveled to ensure that we would get an even and leveled floor throughout. The screed is a liquid mix which covers the water pipes and sets to form a solid floor that we can then lay floorboards or tiles upon.
Lorry with screed mix
Screeding day was very exciting, particular for hubby who loves all the machines and gadgets involved, and because he'd literally worked his socks off getting the floor to this point. The screed came in a large lorry which was then poured into a machine with a sieve in it to sift out all the big pieces. The liquid screed was then pumped from the machine via a large pipe, into our house's ground floor. You can see it in action in the vlog below.
Once the screed had been poured and leveled it gave the floor a glass like, reflective finish. The screed was then left to set for 48 hours before we could walk on it. As it dried, the floor lost it's shiny finish and became a lot more matte. Over the course of those two days I had a bad arthritic flare so hubby stepped in with the vlogging and shows you the finished floor in the above vlog.
The floor just after the screed was poured
I hope you enjoyed this update. I can't imagine underfloor heating is something that most of you reading this would be particularly excited about but it was exciting for us ;o).
For mini progress updates, don't forget to follow me here on Facebook. The rest of my social media links can be found to the right of this blog post, when viewing on a desktop :o).
If you’ve seen this post (and I recommend you do before proceeding :o)) then you’ll know that hubby and
I are currently in the middle of renovating what was once a horses stables into
a house. It’s what we have been spending our time/energy/money (and everything else) on since our return from Japan, earlier this
summer.
Some back ground on our building - historically, the two part building was a stables along with
a gardener’s house. Together, these two properties belonged to a large estate
home with its own fruit orchard and gardens. Unfortunately the large estate
home was, at some point, knocked down and replaced with a small apartment
block. The land has since been turned into public parks
and gardens. All that remains of the original estate are the stables (which we own) with the
gardener’s house (which our neighbour lives in), and another building nearby
which has been converted into a house. From talking to our neighbour and some
of the local residents who have lived in the area for decades, we understand
that over the years the stables was used as some kind of storage building, and
then a vehicle depot before being left vacant for many years.
The old stables block
The stables building we bought is near the beach, in a conservation area which means that the area,
and buildings with in it, are considered worthy of preservation or enhancement because
of their architectural/historical interest. What that meant for us was that we
had numerous restrictions/conditions on how we could renovate the building and
the materials that we could use. One such condition was that before any work
could begin we needed to call out the batman to conduct a bat report. Luckily for us no bats or evidence of bats was
found, otherwise no work could have begun until the bats were safely removed
and rehoused, as bats are a protected species in the UK. Other conditions focussed on restoring the building to the way it
would have traditionally been. We've had to replace all of the plastic guttering
with traditional cast iron guttering, and all of the windows with traditional
handmade wooden sash windows. The local authorities want our building to be
preserved as close to its original state as possible, so we couldn’t create an
opening for a front entrance. To access our property we have to go round to the
back and use the entrance that the horses would have traditionally used.
Our neighbour has the upstairs, whilst we have the downstairs
As you’ll see from the Youtube video below, there is a
natural divide between our building and our neighbours due to the height
difference, with our stables block being the shorter building. However, our
building also came with half of the ground floor space that sits under our
neighbour’s bedrooms. It’s quite strange because we now own half of what looks
like her downstairs space and she owns the upstairs. Our neighbour has lived here for over 30 years so we
assume that this is how the buildings were originally split. Perhaps because
traditionally, more of the ground floor space was used to keep the animals, with
people occupying more of the upstairs sleeping space? Who knows!
When we bought the building it was very much derelict with
just the roof and outer walls. The inside was dirty, rundown, damp and falling
apart. On the ground floor there were two stair cases, two toilet cubicles
(random!), and the space had been subdivided with some rooms bricked up and
partitioned off from others, and some of the windows had been boarded/bricked up.
Upstairs there was a large room, and a smaller room with a kitchenette. There
was also an old garage in the garden. I have inserted photos of what the inside of the building used to look like in the above video.We bought the property with plans to turn it into a
family house. We subsequently gained permission to convert the old garage into
living space, on the condition that we matched the exterior to the existing
building. We had a little bit more freedom to make
changes at the back of the building as it is out of public view, so we were allowed to
brick up one of the doors and turn it into a window.
The old garage
The old garage being renovated
We have completely
changed the layout upstairs by turning the two rooms into three bedrooms (one
with an ensuite) and a family bathroom. The upstairs rooms are built into the roof space with low sloping ceilings and small windows. Luckily we were able to insert
skylights into a couple of the rooms as skylights are quite a
subtle addition. Downstairs there is an ensuite bedroom/study, a living room and
an entrance hallway in the double storey part of the building. At the single
storey end (the part under next door neighbour’s bedrooms) is an open plan
kitchen and dining area which lead on to the main living area (that used to be
the old garage).
Dining area (to be) with kitchen area blocked of by the grey bricks to the left
Dining area with bricks removed to open up the kitchen area
The building work started on the property whilst we were in
Japan but when our time came to an end there, we decided that it was an ideal
opportunity to come back to the UK and live onsite, so that we could manage the
project ourselves. It wasn’t easy to manage the project when we were living
on the other side of the world, especially with the time difference. Putting
our trust and faith into the hands of strangers doing the work was also quite
difficult, especially when it involved all of our life savings and more! Plus,
with it being summertime in the UK, we thought living onsite in a caravan wouldn’t be too
bad.
We’ve been onsite all summer so far and whilst work has been
progressing steadily, the renovation hasn’t been smooth sailing that’s for
sure! As is often the case with such projects, there have been delays,
unexpected costs and problems that just could not have been anticipated.
Needless to say, it is costing a lot more and taking a lot longer than we
expected, but with all of the structural work now complete, we are finally
getting to the stage where we can actually see the progress. This has been
tremendous in giving us the motivation to push on. As the temperature begins
to drop, and the novelty of living in a caravan wears off, hubby and I can finally
see the light at the end of this very long tunnel :o).
I hope you enjoyed this blog post and vlog of our renovation
journey. I will share more as things progress over the coming weeks. Have you ever done a renovation or restoration project? What did you
renovate/restore? What was your experience?